Virtual Classroom Set Up Guide: Overview

The Virtual Classroom is essentially an integrated online meeting/web-conferencing tool – similar to Zoom, WebEx, and other tools. It allows instructors and learners to engage each other via livestream video. You can use Virtual Classroom to engage a large audience and connect up to 7 simultaneous webcams.
Because it’s integrated within the TILE platform, the Virtual Classroom is easy to set up. It’s especially useful for:
- Synchronous learning activities, like online lectures or group activities
- Virtual office hours at regularly scheduled times
Click each tab for step-by-step guidance on how to use the Virtual Classroom for these two activity types.
Select the last tab, "Learner-Created Virtual Classrooms" for information on how to help learners create their own Virtual Classroom meetings.
1 - Set Up Activity
Watch this video for a quick example of how to set up a Virtual Classroom synchronous learning activity in Composer. You can also follow the Step-by-Step instructions below.
Step-by-Step Instructions
Access the Collaboration Admin Page
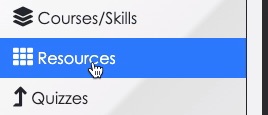
- Select the Courses/Skills option in the side menu.
- Click the Lock & Edit button at the top of the screen. Select the context menu for your practice lesson, and then select the Edit Collaboration option.
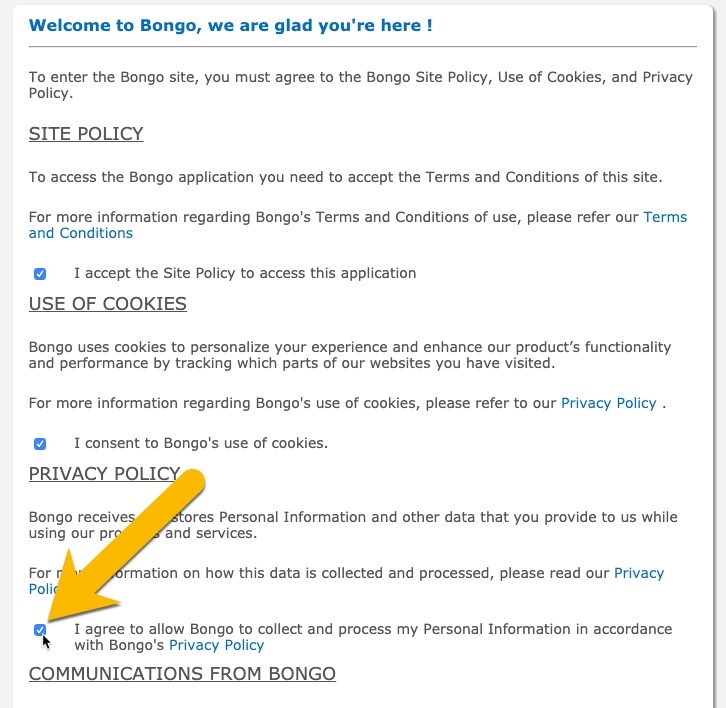
- (If this is your first time accessing the Collaboration Admin Page) select the “I agree…” checkbox to agree to the Bongo plugin terms of use. Then select OK at the bottom of the agreement.
- The Collaboration Admin Page displays.


Create Virtual Classroom Activity
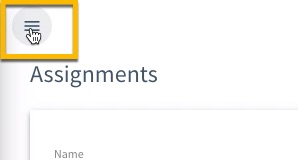
- Select the menu icon at the upper left corner of the Collaboration Admin Page. Then select the Meetings option.
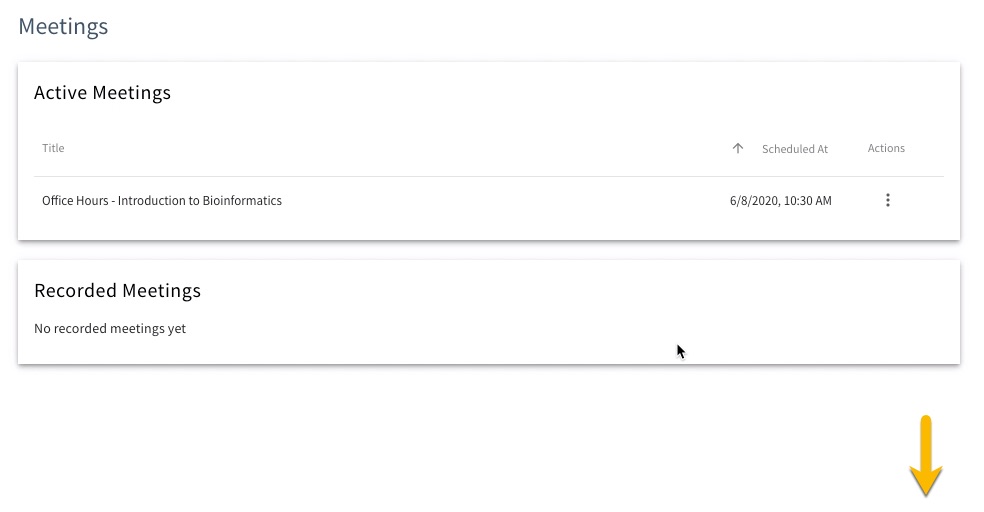
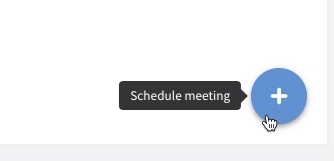
- The Meetings page opens. Select the ‘+’ icon at the bottom right corner of the page to 'Schedule Meeting.'
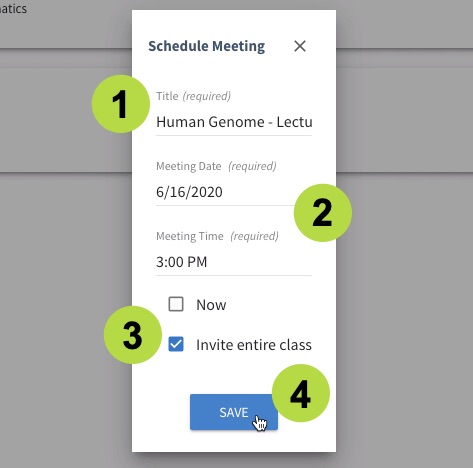
- The Schedule Meeting panel opens. (The Virtual Classroom is essentially a live meeting with collaboration features.) Give your meeting/activity a name.
- Set a Date and Time for the meeting.
- This should be a time when most, if not all, of your learners are available to meet, so you should find out this information before setting up the meeting.
- NOTE: We recommend scheduling a test meeting first – you can use this to get familiar with the Virtual Classroom features, and to rehearse your synchronous activity/lecture. (Refer to Section 2 – “Test/Rehearse the Activity”
- Select the Invite entire class option. This allows a meeting to be scheduled for the entire class without having to invite all users in the course and having to go back and invite more users who join the class later.
- Select Save when you are finished.

- The Meeting Lobby opens in a separate browser tab. Check the name and Starting Time for the activity/meeting.
- Verify the time remaining until the meeting begins. Then close the browser tab to return to the Meetings page in TILE Composer.
2 - Map Virtual Classroom Activity to a Lesson Resource
Your Virtual Classroom activity is set up, but there's one last step. You need to map it to a resource so your learners will be able to see and access it. Watch this video for a quick example of how to map a Virtual Classroom activity to a resource. You can also follow the Step-by-Step instructions below.
Step-by-Step Instructions
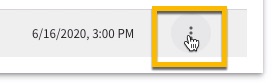
- Select the context menu for the meeting again, but this time select the Copy External Link option. Then select the Close button at the top of the Meetings page.
- Select the Resources option in the side menu.
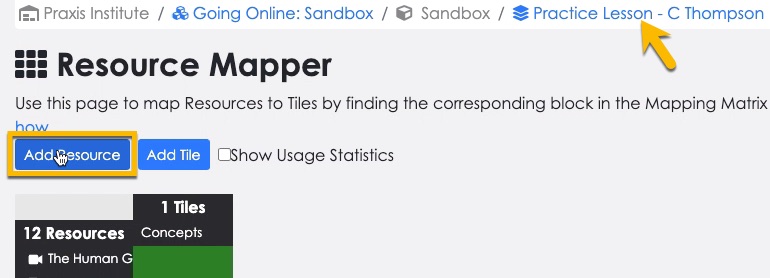
- The Resource Mapper page loads. Make sure it is the right page for your practice lesson/course by looking at the breadcrumbs at the top of the screen. If your lesson/course isn't displayed, click the last breadcrumb to open the course selection screen and then select your lesson. Then select the Add Resource button.
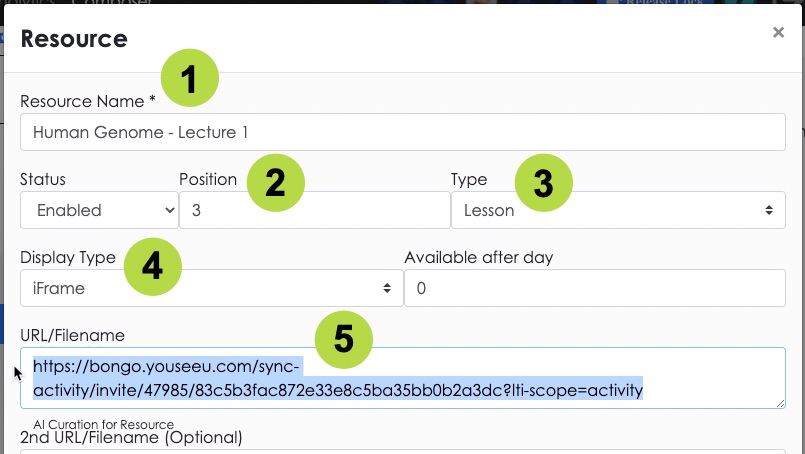
- The Resource settings panel opens. Give your activity a name.
- Set the Position for the activity so it displays in the right order in the lesson.
- Set the Resource Type to "Lesson."
- Leave the Display Type set to iFrame.
- Paste the "External Link" you copied in Step 1 into the URL/Filename field.
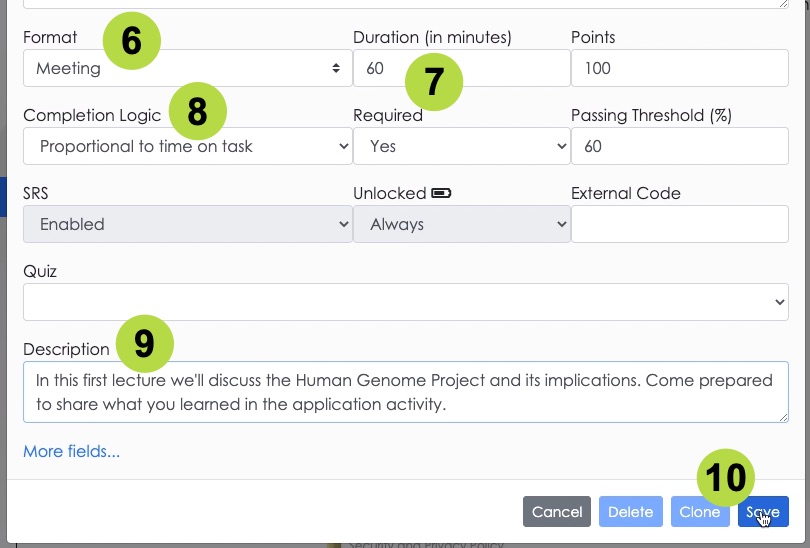
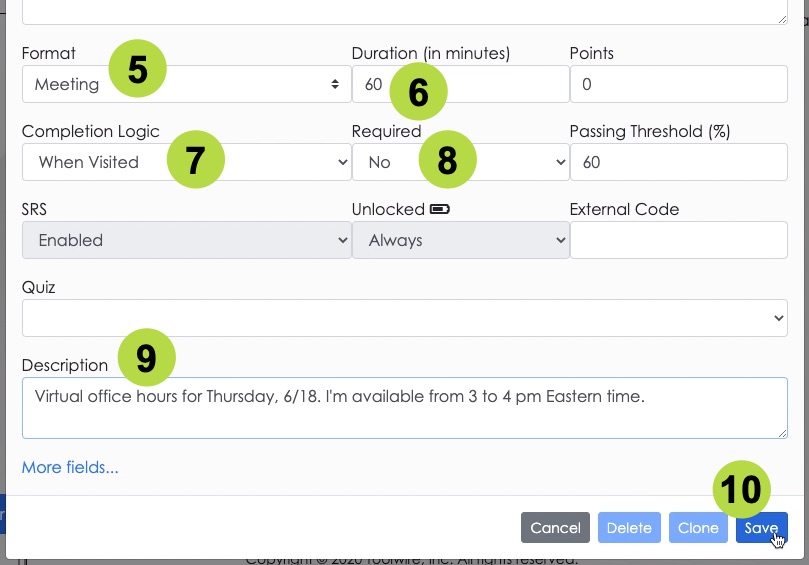
- Set the Resource Format to "Meeting."
- Set the Duration for the activity.
- Set the Completion Logic to your preference.
- Enter a brief Description of the activity. Learners will see this description in the course interface.
- Select Save when you are ready.
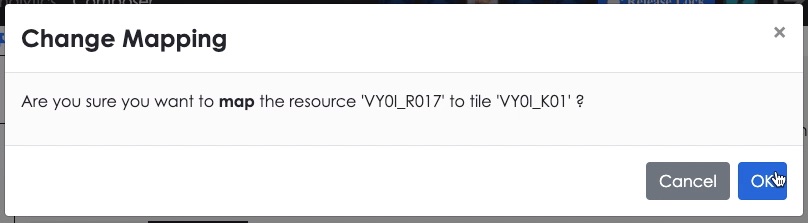
- The activity appears in the resource list, but is not yet mapped. Click the empty cell next to the activity name to activate it.
- Click OK in the confirmation box. The activity is now enabled and ready for your learners!

More Info
Click here for more information about using the Virtual Classroom.
1 - Set Up Virtual Office Hours
You can use the Virtual Classroom feature to set up re-occuring “virtual office hours,” where your learners can ask you questions and interact with you in real-time. The process for setting up Office Hours in Composer is the same as setting up synchronous learning activities, with a couple of minor differences. Watch the video below to see how it’s done. You can also follow the Step-by-Step instructions below.
Step-by-Step Instructions
Access the Collaboration Admin Page
- Click the Lock & Edit button at the top of the screen. Select the context menu for your practice lesson, and then select the Edit Collaboration option.
- The Collaboration Admin Page displays.
Set Up Office Hours
- Select the menu icon at the upper left corner of the Collaboration Admin Page. Then select the Meetings option.
- The Meetings page opens. Select the ‘+’ icon at the bottom right corner of the page to 'Schedule Meeting.'
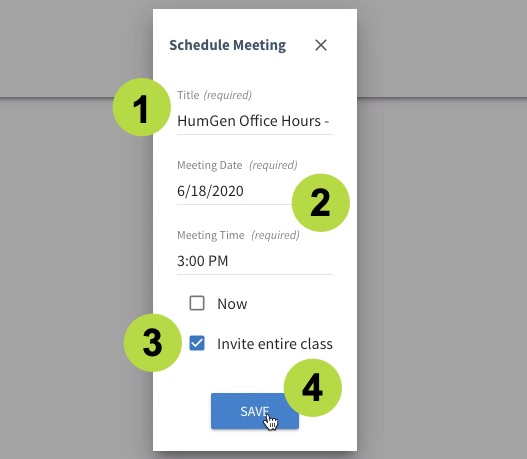
- The Schedule Meeting panel opens. This meeting is for your first Office Hours session - give the session a name, preferably with the date included.
- Set a Date and Time for the Office Hours session. This should be a time when most of your learners are available if possible, so you should find out this information before setting up the meeting.
- Select the Invite entire class option. This allows a meeting to be scheduled for the entire class without having to invite all users in the course and having to go back and invite more users who join the class later.
- Select Save when you are finished.
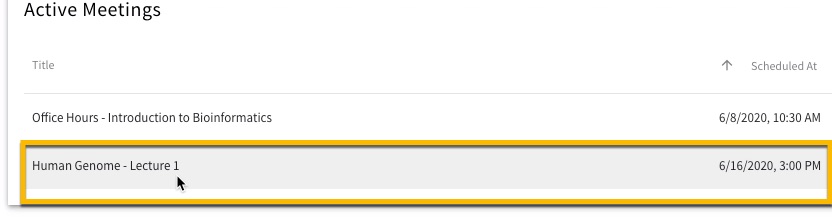
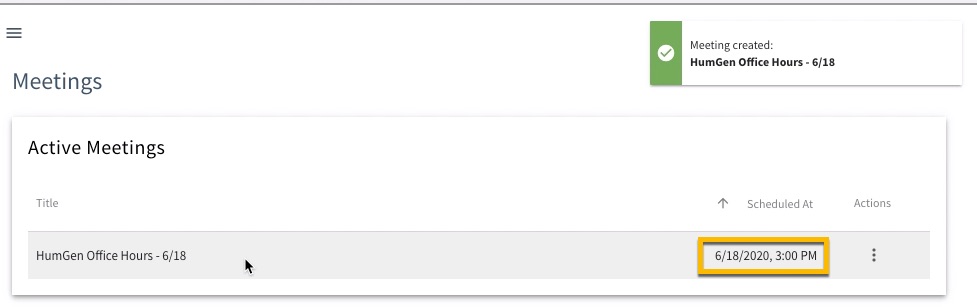
- The new Office Hours session is added to the ‘Active Meetings’ list, with the scheduled date and time indicated.
- Repeat the steps above for each additional Office Hours session you plan to hold (e.g., twice a week, weekly, etc.). Continue to the next session to see how to map each Office Hours session to a lesson resource.
 (back to top)
2 - Map Office Hours to a Lesson Resource
Your Office Hours session is set up, but there's one last step. You need to map it to a resource so your learners will be able to see and access it. Watch this video for a quick example of how to map an Office Hours session to a resource. You can also follow the Step-by-Step instructions below.
Step-by-Step Instructions
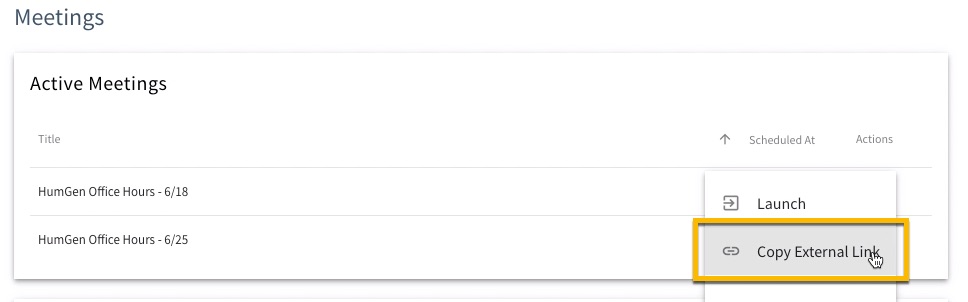
- Select the context menu for the Office Hours session and select the Copy External Link option. Then select the Close button at the top of the Meetings page.
- Select the Resources option in the side menu.
- The Resource Mapper page loads. Make sure it is the right page for your practice lesson/course by looking at the breadcrumbs at the top of the screen. If your lesson/course isn't displayed, click the last breadcrumb to open the course selection screen and then select your lesson. Then select the Add Resource button.
- The Resource settings panel opens. Give your Office Hours session a name.
- Set the Position for the session so it displays in the right order in the lesson.
- Set the Resource Type to "Lesson."
- Paste the "External Link" you copied in Step 1 into the URL/Filename field.
- Set the Resource Format to "Meeting."
- Set the Duration for the Office Hours session.
- Set the Completion Logic to "When Visited."
- Set the Required field to "No," since Office Hours are optional.
- Enter a brief Description of the Office Hours. Learners will see this description in the course interface.
- Select Save when you are ready.
- The activity appears in the resource list, but is not yet mapped. Click the empty cell next to the activity name to activate it.
- Click OK in the confirmation box. The activity is now enabled and ready for your learners!


Overview
Learners can also create and control Virtual Classroom meetings within ‘Individual Project’ and ‘Group Project’ activity types. This capability is integrated right into the activity features and is easy-to-use. Watch this video to see how this is done, so you can advise your learners accordingly.
Virtual Classroom for Individual Project Activities
You might be wondering how a Virtual Classroom/meeting capability would be useful for an individual project/activity. Here’s a few ways a learner could use the feature:
- Invite one or more other learners to peer review their work in a live session
- Schedule and record an interview with a subject as part of the assignment
- Host a live “coaching session” with the instructor or a mentor where they can get feedback on a presentation or works in progress
Refer to the information below for admin and learner instructions related to using the Virtual Classroom for Individual Projects.
Step-by-Step Instructions
For Admins/Instructors
Follow these steps to make sure the “Meetings” (Virtual Classroom) feature is enabled for the activity:
- Select the context menu for the skill/lesson, and then select the Edit Collaboration option.
- The Collaboration Admin Page displays. Select the context menu for the activity, then select the Configure option.
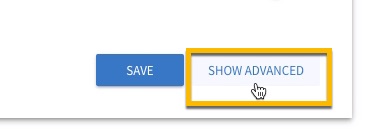
- The configuration page for the activity loads. Scroll down and select Show Advanced.
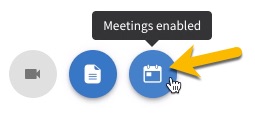
- In the Toolset section, make sure the “Meetings” option is enabled.
For Learners
Here are the steps learners will follow to use the Virtual Classroom within the activity.
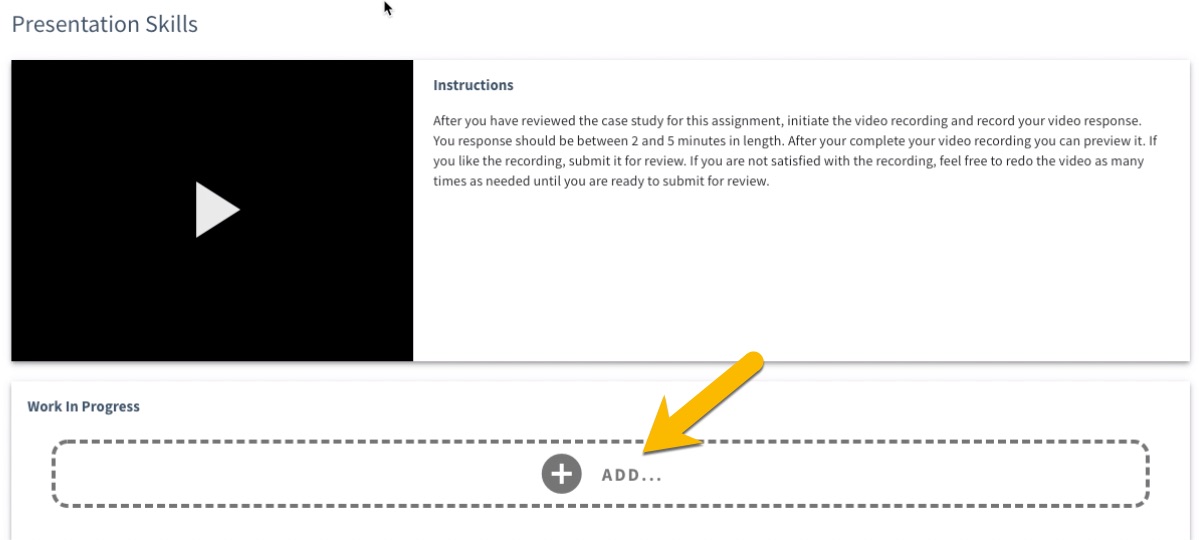
- Launch the activity, then select the ‘+ ADD’ button.
- Select the MEETING option in the Work In Progress section.
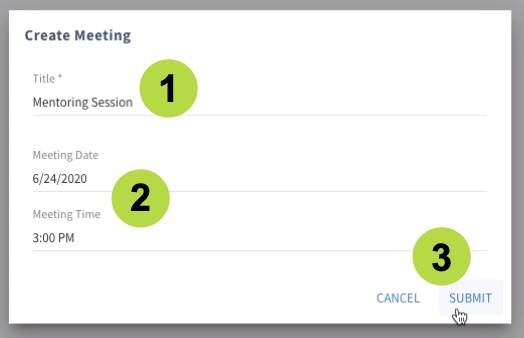
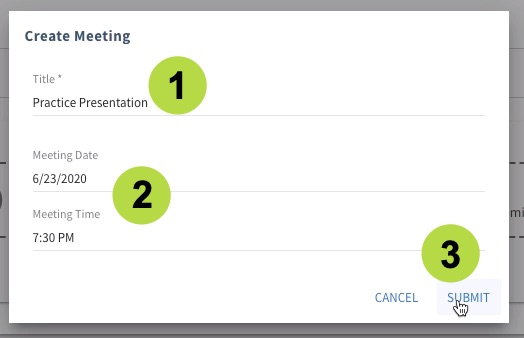
- The Create Meeting panel opens. Give the meeting a Title (e.g., “Coaching Session”).
- Set a Date and Time for the meeting. This should be a time that has been agreed to by all participants.
- Select Submit when you are ready.
- The new meeting is added to the ‘Scheduled Meetings’ list, with the scheduled date and time indicated.
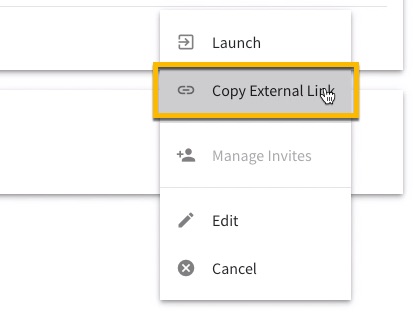
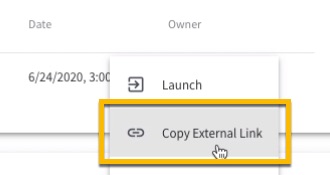
- To share the meeting link, select the context menu for the meeting and then select Copy External Link. Then paste the link to an email or other message to those you want to invite to the meeting.
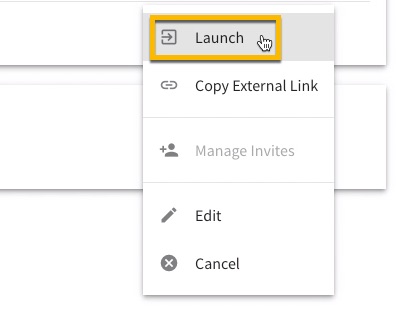
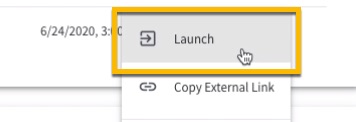
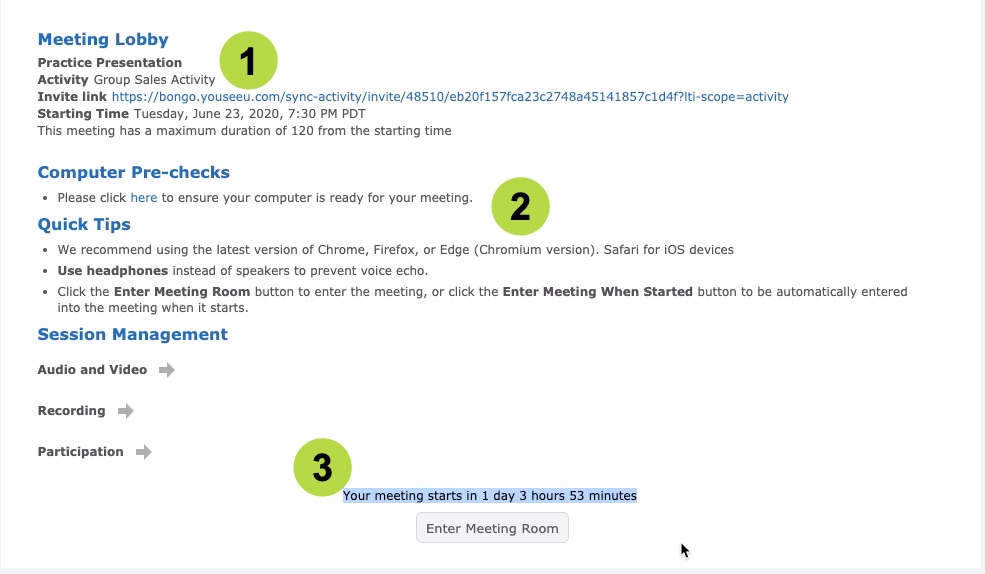
- Select the Launch option in the context menu to access more information about a meeting.
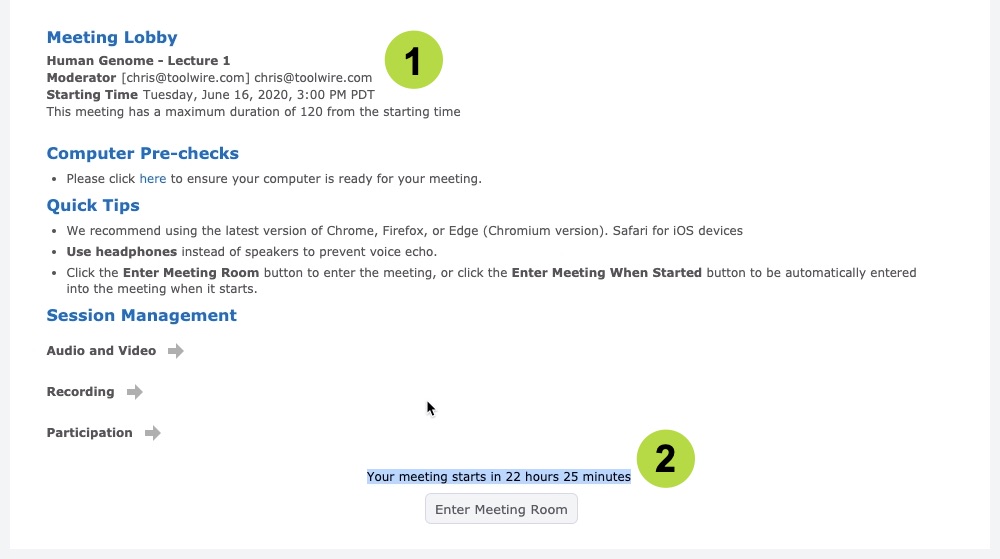
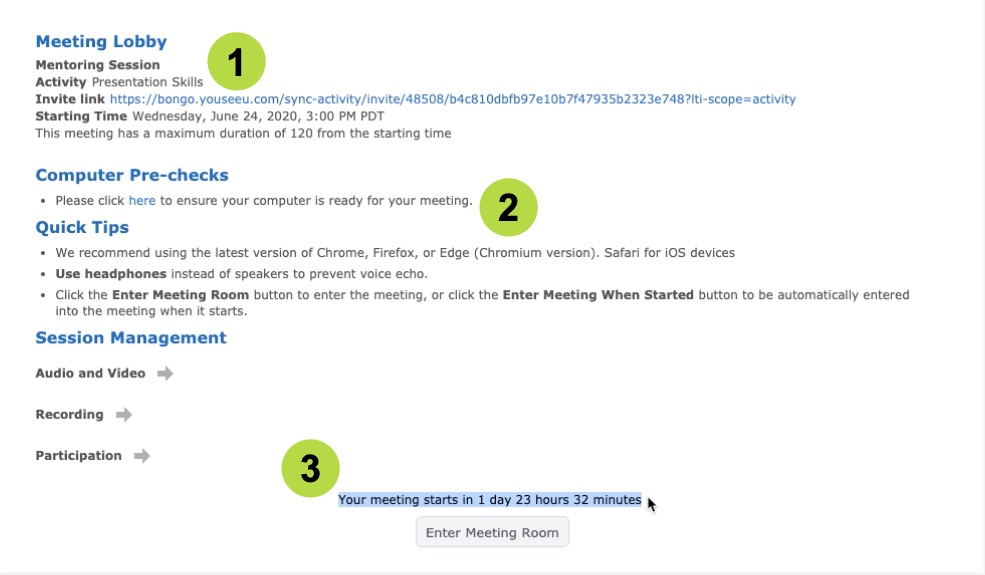
- The Meeting Lobby opens. Confirm the Title and Date/Time of the meeting. An ‘invite link’ is visible here as well, to share as desired.
- Review the instructions for “Computer Pre-checks” and “Quick Tips,” and share with other participants if desired.
- Note the countdown timer for the meeting.


Virtual Classroom for Group Project Activities
For obvious reasons, the Virtual Classroom/meeting capability is a useful tool for Group Project activities. Here’s a few examples
- “Kick-off” meeting to get acquainted and assign project responsibilities
- Meetings to collaborate, such as reviewing works in progress or practicing presentations
- Meeting to record group videos and virtual presentations
Refer to the information below for admin and learner instructions related to using the Virtual Classroom for Group Projects.
Step-by-Step Instructions
For Admins/Instructors
Follow these steps to make sure the “Meetings” (Virtual Classroom) feature is enabled for the activity:
- Select the context menu for the skill/lesson, and then select the Edit Collaboration option.
- The Collaboration Admin Page displays. Select the context menu for the activity, then select the Configure option.
- The configuration page for the activity loads. Scroll down and select Show Advanced.
- In the Toolset section, make sure the “Meetings” option is enabled.

For Learners
Here are the steps learners will follow to use the Virtual Classroom within the activity.
- Launch the activity, then select the ‘+ ADD’ button.
- Select the MEETING option in the Work In Progress section.
- The Create Meeting panel opens. Give the meeting a Title (e.g., “Coaching Session”).
- Set a Date and Time for the meeting. This should be a time that has been agreed to by all participants.
- Select Submit when you are ready.
- The new meeting is added to the ‘Scheduled Meetings’ list, with the scheduled date and time indicated.
- To share the meeting link, select the context menu for the meeting and then select Copy External Link. Then paste the link to an email or other message to those you want to invite to the meeting.
- Select the Launch option in the context menu to access more information about a meeting.
- The Meeting Lobby opens. Confirm the Title and Date/Time of the meeting. An ‘invite link’ is visible here as well, to share as desired.
- Review the instructions for “Computer Pre-checks” and “Quick Tips,” and share with other participants if desired.
- Note the countdown timer for the meeting.


More Info
Click here for information that can be shared with learners about how to use the Virtual Classroom.